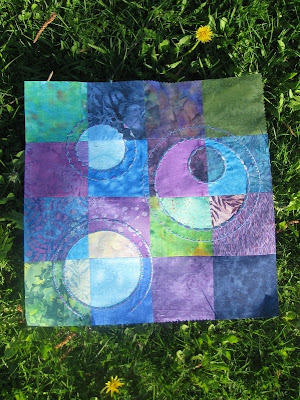
Ostin jo maaliskuussa ompelukoneeseeni harpin = apuvälineen, jonka avulla on helppo ommella ympyröitä. Tähän mennessä en ole ehtinyt sitä kokeilla, mutta nyt kun sen tuli vastaan pöytää siivotessa, ryhdyin tuumasta toimeen. Ensin vähän harjoitusta harpin kanssa.
Ohjeessa neuvottiin katsomaan kolme mallikertaa ennen loppua, miten on käymässä, ja säätämään pituutta sen mukaisesti.Ihmeellistä miten tuo kolmiokoruommelkin päättyi kuitenkin tasakuvioon ilman sen kummempaa säätöä.
Harjoituksen jälkeen oli vuorossa Libby Lehmannin tekniikalla toteutettu tilkkutyö. Siinä rakennetaan kaksi tilkkupintaa, toinen tummista ja toinen vaaleista sävyistä.
Ideana noissa on, että samat värit ovat samoissa kohtaa kummassakin, esim. vasen yläkulma on vihreä, seuraava turkoosi, sitten lila ja taas turkoosi. Kun tilkut on yhdistetty (saumanvarat silitetään auki), tilkkupinnat asetetaan päällekkäin, vaalea alle, tumma päälle. Risteykset ja saumat kohdistetaan ja kiinnitetään nuppineuloilla.
Seuraavaksi tehdään ympyrät. Hahmottelin niiden paikkaa ensin piirtäen, ja sitten ompelin ensimmäisen harpin kanssa. Ensiksi ympyrä ommellaan suoralla ompeleella, ja ympyrän sisus leikataan päällikankaasta pois aivan ompeleen vierestä.
Seuraavaksi ommellaan ympyrä uudelleen, tällä kertaa koristeompeleella, joka huolittelee leikatut reunat samalla kertaa.
Kaikkiaan tein työhöni kolme ympyrää, ja ompelin niiden ympärille vähän ulommas vielä toisen koristeompeleen. Isoimman ympyrän sisälle ompelin takaisin palan keskeltä irti leikattua ympyrää. tällöin pois leikattava kangas on pikkuympyrän ulkopuolella, ja leikataan samalla tavoin ompeleen vierestä.
Kaikkiaan tein työhöni kolme ympyrää, ja ompelin niiden ympärille vähän ulommas vielä toisen koristeompeleen. Isoimman ympyrän sisälle ompelin takaisin palan keskeltä irti leikattua ympyrää. tällöin pois leikattava kangas on pikkuympyrän ulkopuolella, ja leikataan samalla tavoin ompeleen vierestä.
Kun ompelut on ommeltu, alapuolelta voi leikata pois ylimääräiset osat vaaleasta tilkkupinnasta. Huom! Harpilla ommellessa tulee aina käyttää alla kirjontatukikangasta.
Hauska työtapa, tätä täytyy kokeilla vähän isommassakin mittakaavassa. Tähän käyttämäni kangasneliöt olivat 4 x 4". Suurin ompelemistani ympyröistä on halkaisijaltaan n. 14 cm, pienin mahdollinen on halkaisijaltaan n. 5 cm, suurin vähän yli 20 cm.
*********************************************
I bought a circular attachment tool for my Bernina already in March, but haven't had time to try it. Today as I cleaned my sewing tables I came across it and decided that now is as good a time as ever. First I did some testing with different embroidery stitches, it's ashtonising how well the stitch comes together, in my exercises I did nothing to help and yet it matched with the triangles just like that!.
So now it was time to try the Libby Lehmann technique that I'd seen in TQS ages ago. I made two small quilts out of 126 pcs of 4 x 4" squares. The idea is that one of them is light, the other dark. Same colour is to be at the same place in each of them. Like top left corner is green, next one is turqoise, then purple and green etc. When the patches are sewn together, the quilts are placed the light one down, dark on the top, both have the right side up. The seam crossings and the seams are placed exactly on one another and secured with pins.
Then a circle is sewn wirtn straight stitch and using the tool. The fabric of the top is cut sway inside the circle and right next to the stitching = carefully! After that the circle is sewn again, this time with a decorative stitch that secures the cut edge of the circle at the same time. After sewing the three circles, I added a small circle inside the largest circle by putting the cut circle back in place. In this case the excess fabric is on the outside of the small circle, but otherwise it's done the same way. I also added some decorative stitches around the circle.
Finally I cut away the excess light quilt under the dark one.
Quite a fun technique and worth trying. I'd love to make a larger one: the tool sews circles varying from 2 to 10-11".


Ei kommentteja:
Lähetä kommentti